Tuesday, April 29, 2008

Ballroom Re-hash

This is a re-post from my original blog that was hacked a while back:

August 10, 2007, 10:22 pm

Enjoy the links on the Right and email me if you've got a good one to add.

BallroomCap

One of the latest Revit models I've finished was this ballroom. The dentals(hard to see) were created using a line-based family which is hosted to the moulding and made a quick job of it. There are some elements here using model lines to create/represent the form, including the secondary chandeliers, and column capitals. This model made for an enjoyable 2 weeks. The rendering is using Revit 2008's built in accurenderer which was satisfactory, but 3D max would have provided a much better result.

Academy Ballroom 2

Building complex calculation into families, far beyond those in the line-based family referred to above, are fascinating. Tutorials will be posted in the Revitology section and will cater to fun how-to's and Revit modelling methods and tricks.

Keep Watching.

Wednesday, April 23, 2008

Bench (and Windows Live Writer Test)

I'm entering a competition that a furniture company has put on. They specialize in plywood furniture so I have taken a sheet of plywood and bent it into itself, then locked into place with a little Japanese style joinery. It's a Japanese company. I'm using  Revit 2009


Bench

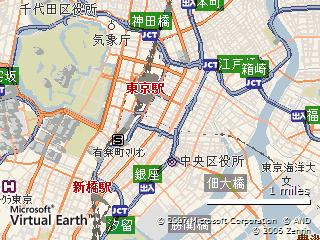
The competition is located here:

Map image

Done with Windows Live Writer which I like a lot.


... I have continued to work on this bench over the weekend and made some minor changes.  Being parametric and adjustable to any size made for some complications which I haven't worked out. The overall width of the bench is not difficult to make parametric. The only tricky part is repeating the pin-joints along the back as the width varies. This can be done using an array, but it's worth noting that with parametric arrays, come added computation which in turn leads to a heavy component. 

The trickiest part of this component & design is varying the angle of the front and back. I need the reference lines that determine the angles to pivot around the center of the corner radii, so the nicely curved corners don't deform when the angle is adjusted. It sounds easy but I haven't gotten it to lock down.

Here is the latest image and video:

SustainaBench


I think I have solved my little rounded corner problem with some math, two reference planes creating an origin for a reference line, and some angle parameters. This should allow my corners to flex without deforming or breaking constraints. We will see if it works in the field. stay tuned


 Capture test corner(ya wouldn't think it was so difficult)

Wednesday, April 16, 2008

Philly Revit User Group - Next meeting about Revit 2009

If you are in the Philadelphia or surrounding areas, please join us at the Philadelphia Revit User Group.
Check out the boards here and attend the next meeting!
 

Friday, March 14, 2008

Rendering tool in Revit 2009

Being one who has always preferred showing renderings over floor plans and spent a fair amount of time generating Accurender renderings in previous versions of Revit, I am thrilled with the transition to Mental Ray in RAC 2009. The whole rendering process has been simplified, for the better in my opinion, as you can see by the sparse designbar options for the "Rendering" tab!  The factory could have just put the lone button under the "View" tab and gotten rid of the tab entirely! Don't be discouraged by it's limited appearance. Enhancements to the Rendering engine, Materials and Exposure adjustments should keep you content.
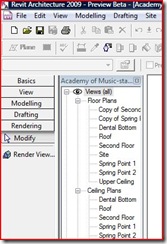
r1

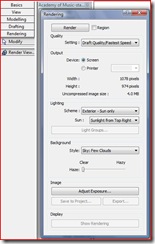
The first Dialog you see when you click the lone "Render View..." button is this, giving you options for rendering the view or Region of the view, the resolution by screen or print size, lighting options, background options and the "Adjust Exposure" tool which is worth it's weight in gold(can I say that about a dialog?)
The lighting drop-down gives you six options, 3 for exterior and 3 for interior renderings, and each of those consist of Sun only, Sun + Artificial light, and Artificial light only.
r2

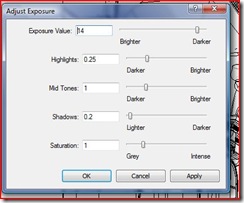
The Exposure adjustment tool is a powerful tool and very welcomed tool, giving the ability to make high quality adjustments to 5 different exposure settings. This feature saves a bundle of time usually spent on post-production in Photoshop.
r3

Materials have also had an overhaul. The patterning appears to be exactly the same, but you will note the cleaned-up interface. Gone are the smoothness and glow settings, leaving only transparency in the shading box.
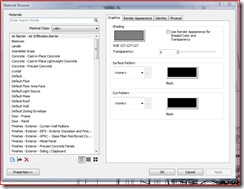
r4

The Render appearance tab is where things are turned up a notch with a respectable library of materials, and material settings, including one I've been wanting for years now, yes, Bump Maps! 
There are also better preview options and more which I will get into later, but I've got to get to the mines! I'll post the rest later.
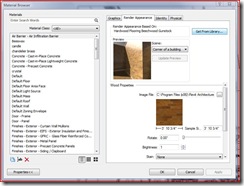
r5

Monday, February 25, 2008

Loft Blendiness

Playing around today with the massing tools in Revit2009 I had 2 hours to burn and I whipped up a fun little building.  This is a combination of a blend loft and various voids. Which then I skinned with wall types and made floors and etc. It's highly suspect whether this is structurally sound but it was more of an exploration of the new loft blend tool.

bendiness1

A view from the front. The plans that this study model generated were very good and brought to mind the complicated task of documenting a building with such an organic form, and the necessity to establish simple math foundation to the form.

bendiness2

Once I arrived at the general form I was shooting for, I stopped and threw on some materials for a few quick renders to see the results. 
Revit is an amazing tool for doing quick studies such as this. What I'm not showing is the additional data that this model provides such as square feet, volume, quantity take-offs and etc.

bendiness3