I get this question a lot - I love hearing from people about their projects and renderings - so I thought I'd post this one
To: craig irevit.com
Subject: Rendering Settings
Dear Craig,
What settings do you typically use for interior and exterior renderings to get the best rendering? In switching over to Revit 2009, I am having a hard time getting the same, if better, quality of renderings.
Also, are there no clouds anymore in 2009? When we adjust the setting for sky, we never get clouds, no matter the setting chosen. Also, what settings have you found to typically work for quality? Such as general options, image precision, ext.
Thanks,
Sara
______________________________________________
Hi Sara,
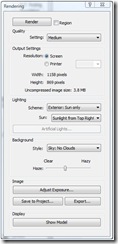
In the Render Dialog, there is a setting for the “Scheme” in the lighting area. You want to choose the most appropriate/applicable setting for the type of rendering you have. If you are using it for interior rendering, and have lights inside the space, and windows, you will want “Interior:Sun and Artificial”. This choice makes a huge difference in the way and locations the mental-ray rendering engine bounces light.
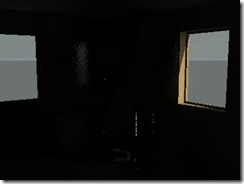
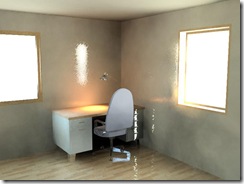
When you render with “draft” or “low” quality settings you will get a good enough image to judge whether the settings are providing what you are looking for. If it looks good, then you can render with “Best”. Once you get the lighting right, and render with the “best” setting, then you can use the “Adjust Exposure” button and adjust the various values for more contrast and etc. Below are two examples of the differences achieved with the settings.
Image with Lighting Scheme: Exterior Sun only, and no exposure adjustment, Quality-Low
Image with Lighting Scheme: Interior Sun and Artificial and exposure value at 8.2, Quality-Medium
Image with Lighting Scheme: Interior Sun and Artificial and exposure value at 8.2, Quality-Medium and hidden line overlay
Clouds, and more
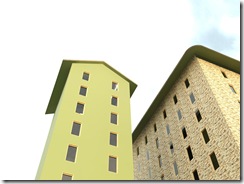
In terms of clouds, yes there are still clouds available. The setting is located below the lighting in the background settings. You have the option of 5 degrees of cloudiness or a color, as well as a slider for haziness. Below you see three different cloudiness settings rendered with medium quality. I you don't get clouds no matter what settings you set, than I would have to believe that your installation was not complete and you did not get the Render package.
Other important considerations are choosing good materials, setting the best light direction and render quality. Revit 2009 has a much better library of materials than previous versions. You can also take the stock materials and vary the bump mapping depth and glossiness and etc. Remember to make a duplicate of the material before you change any of the settings. Once you have rendered your test in Draft setting, adjust the exposure with the "Adjust Exposure" button dialog. The exposure value will bring your rendering from the depths of pitch black to daylight exposure and beyond to over-bright white. Then you can play with the highlights and mid tones and other settings to get the perfect image.
Image with Lighting Scheme: Exterior Sun only,
Quality:Medium,
Background Style: No Clouds, and low haze
Image with Lighting Scheme: Exterior Sun only,
Quality:Medium,
Background Style: Cloudy, and low haze
Image with Lighting Scheme: Exterior Sun only,
Quality:Medium,
Background Style: Very Cloudy, and no haze
Image with Lighting Scheme: Exterior Sun only,
Quality:Medium,
Background Style: Color-Black (note: no haze and no gradient available)
The output settings for your final image can be approximated by the end use of the image. For example if you plan on showing the image in a Powerpoint slide show, then the "Resolution" setting can be set to "Screen" and you can zoom in the view until the width and height is about 1024 pixels by 768 pixels. This would be fine for the typical Powerpoint.
If you intend on printing the image, a good resolution to use for typical prints is 150 DPI. By default the field of view is 6" by 4 1/4" but you can change the size by selecting the crop region of the Perspective 3D view and clicking the size button in the options bar shoeing the dimentions. In the "Crop Region Size" dialog that pops up, select "Scale(locked proportions" and change the width to the size of the space you need to fill. The height will adjust proportionately. Click OK and you will see that the view adjusts scale but doesn't change the extents.
If you are still having trouble email the picture and/or file and I’ll check it out.
I’d love to see it when you’ve got it looking good.
Cheers,
Craig


5 comments:
Hi Craig
Good blog!
I've just been playing around with your rendering post and trying some of the things you have suggested with good results.
One of the interior images, '3d view 2b' has the description that ends with '... Quality-Medium and hidden line overlay'. How is the hidden line overlay done? Is it done using revits rendering settings or is photoshop used post render?
Thanks Grasshopper,
Yeah, the hiddenline overlay is a post production trick and not built in to Revit. It looks especially good with a model that has no materials set up but a generic gray.
You can do it in photoshop but you will get better results if you print the hiddenline as a vector-line pdf and bring it into Illustrator to overlay on the rendering. This way you can control the lineweights of the hidden line.
Cheers
Wow thanks for the tips, lol I was looking all over Revit for "hidden line" magic, seems to make the renders look much better.
Thanks for your blog, keepit up.
cheers
Tony
hi
i wish to know how you could possible get your render to change backgrounds i have tried several times but still my background remains as gray. could you please explain in full as to how i can go abouts ckecking as to where or y my background doesnt appear, or what could be missing and how can i find it out.
Sharina
Well if you are following the instructions in the post and selecting the options listed then you'll get the sky as shown. If you aren't, then I'm guessing that your rendering library isn't installed correctly. Check with your IT or tech support.
Post a Comment